-

Eduvision provides MBS teachers with their own video channel. Eduvision is a district-purchased software package for video storage and so much more. While this is not a new resources for our teachers, new features are constantly being added.
The software and resources are available on any device and provide safety measures for our students. Teachers may use features like screen capture/recording, editing features, assessment quiz, add captions, translation, and ADA compliant. The resource also integrates with our LMS, Schoology. Once you connect the two software packages, you may use the materials in Schoology or as a stand-alone product. You may also embed the video content along with documents that go with the lesson on your web pages.
Learn a little more about why we use Eduvision by watching this video.
-
Connecting Eduvision and Schoology
Step 1: Connect Eduvision and Schoology
In order to create your own Channel, we must link to the two products.
- We introduced the upgraded features in the spring of 2022. You may have already completed Step 1. You will be able to tell if while in Schoology you are able to click Eduvision and see your videos.
- If you have not connected the software, please complete the following steps:
- Access Schoology and open one of the courses that you are a teacher in.
- Using the left navigation bar, scroll and click Eduvision.
- In the middle of the screen your account should link. SUCCESS
- If you did not link, you will see a bar.
- Click the drop-down arrow of the bar and select mbhs.
- Then click the Proceed button.
- Now you should see Eduvision in the middle.
Time to Close Schoology. This part is now complete for all of your courses. This was Step 1.
-
Capture Video
Eduvision Capture provides the tool to screen capture content from your computer.
- Eduvision video on Eduvision Capture. The video includes step-by-step video instructions as well as step-by-step images.
- Steps include:
- Click the Eduvision icon squares and select Eduvision Capture.
- Add video title and description.
- Select the Channel for your video to be published.
- Select your "capture" options (Webcam, Desktop).
- To start recording click the round record button.
- Click button to stop recording when complete.
- Video will automatically process and upload to the channel.
- Click the play button to review your video.
- The video is now loaded to your channel. You may use the editing tools as needed, add passwords, questions for a quiz, embed, and more.
- Eduvision video on Eduvision Capture. The video includes step-by-step video instructions as well as step-by-step images.
-
Get Embed Code
If you would like to obtain the embed code of the Eduvision videos you upload, you can easily access and paste them into Schoology or a web page.
- Click the square again.
- Select Manage Assets
- Now you will see the Embed options to select.
- Copy and paste to Schoology or your website.
-
Upload a Video
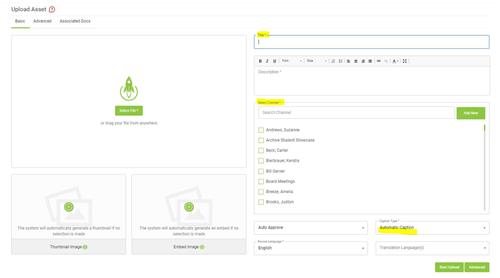
Click the square to see options. Select Upload Asset.
- Select the video you wish to upload
- Name your video. Be strategic about your naming schemes so you can easily find items later.
- Be sure to select your channel.
- You may upload a thumbnail or let the software select one.
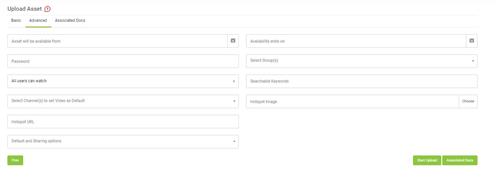
- Additional options are available if you select Advanced. Items like when available, password protect, associated documents, etc.
- When finished click Start Upload


-
Add to Schoology
-
How to insert Eduvision Material from Schoology Course - There are 2 ways to do this depending on if you’ve added quiz questions to your video or not.
-
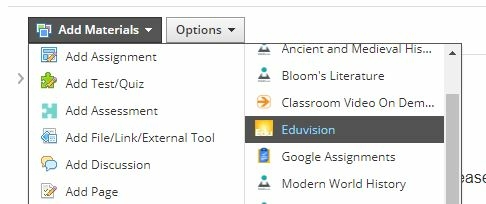
To add a video with quiz questions, in Schoology, select Add Materials/Eduvision (and you’ll see all of your videos with quiz questions that you select to add.

-
To add a video without quiz questions, in Schoology select Add Materials/Add Assignments/select the add content icon and select Eduvisoin (and you’ll see your videos without quiz questions that you select to add.)
-

-
-


